Thursday, December 30, 2010

Hosting a Diva Party For Your Diva Friends

Below are fun pictures of a Diva Party created for a client, but as an edit to this post, I would like to add our latest edition: 
A Diva Cosmopolitan Party In A Box.  

 While Supplies Last - For ordering information you can follow this link to our diva cosmopolitan in a box page


Here is a party that I had a BLAST creating.  This is a Diva Theme party that was for about 20 women. I was brought in to create the look, the invitations, the favors, the menu, and then Leanne from Party Accommodator and I  did everything from greeting guests to pouring champagne so that the Divine Diva herself could enjoy her magical evening. 


The invitations created were custom printed for us from The Write Expression, then I embellished them with crystal snowflakes.  In the background of the picture is the large napkin ring that you will see used later, an ornament that was used to close the gift bag, and my boa catalog (doesn't every Diva need a boa?).


Custom Napkins? But of course! And the colors match the sign, I painted, which you will see below. 


Inside these sparkling gift bags are black boas that I ordered from one of my suppliers and a "Bling Ring" that each Diva wore during the evening.  Seeing the women open their bags and hearing them laugh was just the reaction I was going for.  It is hard to see, but the crystal ornament is being used to close the bag, then I tied the top with a hot pink bow. 


I painted and lettered this sign for Santa to greet the guests. His tiara was a perfect fit, and lucky for him, I ran out of time to put on his fake eyelashes.  He was placed out on the front porch the night of the party with a spot light on him. 


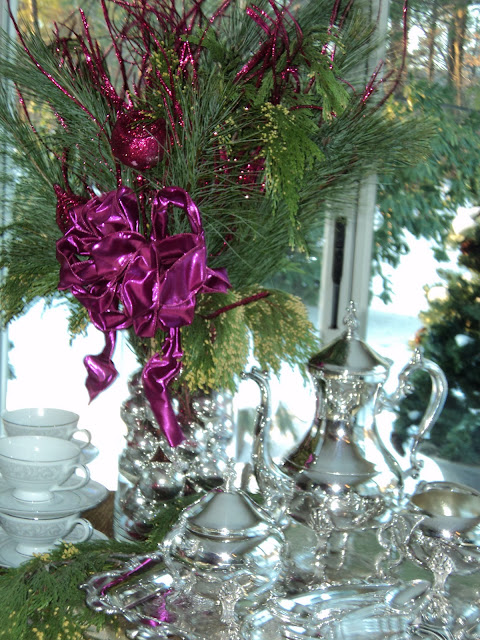
Using the clients silver service and props purchased for this party, I created a tablescape of white, hot pink, black and silver.  After the caterer dropped off the food, I plated it for the buffet. 


A Diva Party would not be complete without HUGE bling napkin rings.


Here is the dessert and coffee table.  Fresh cedar surrounded the the coffee tray and I since I am not a florist, I created a casual arrangement with Christmas ornaments, cedar, white pine, and sparkly hot pink accents.


Here is is at night with the delicious desserts placed on the table.  


Leanne pouring the coffee for one of the Divas

If you would like your own Diva Party, created just for you, send me a note! E-mail


Thursday, December 16, 2010

A Farmhouse Christmas Party


Sure I love working with my New England interior design clients, but I LOVE New England event and party styling.
Here are some photos of a class New England style Christmas party I styled for a client and their 60 guests.  This particular event was in a private New England home, so I created items they could use every year.  Getting out my glue gun, scissors, and wire, and got to work on this event.  I can't wait to get photos from my client with pictures of the food buffets and bar area.

New England Style Christmas or Natural Theme Party Favors


 For favors, I decided to wrap evergreen scented candles in burlap (burlap was a large part of the decor for this party) with small pine cones.   After they were complete, I attached a note on the back of each one from the host and hostess.  Below, you will see a picture of the favors in a basket that was placed in the front foyer. 


The candy buffet, as you can probably tell, had a theme of red, green, and white.  Custom labels were created, for each candy, with cute sayings that had to do with each treat.


I am so glad the candy is out of my house now.  Keeping it in my home was such a tease to candy taste testers.  


For the table that was going to be used for the appetizers, I hung a twig, greenery, and berry wreath upside down off of the chandelier.  Tiny checkered bows were used to cover the wire.  


For the dessert station, I found an old sled and embellished it with greens, red jingle bells, pine cones, and a burlap bow.  I can't wait to see photos on how this looked once the caterer placed the desserts on top and around this piece.  My client informed me that many of the guests are going to put sled on their dining room tables now just for decoration.  


Yup.... I used a lot of burlap for this job.  Some was a higher grade from a fabric store and some of it was from a local feed and grain store.


I wished the decorations showed up in the photo, but for some reason a lot seemed to disappear once the flash went off, but this simple tree had pine cones, twigs, red ornaments, red jingle bells, metal stars that I painted an antique  gold, and a burlap bow and cascading ribbon 


For the front hall that was lacking an item on the wall, I found a pair of old wooden skis, screwed them together and added greens, pine cones, bells, and what else?  Say it with me now........ a burlap bow.  the basket on the table is holding all of the candle party favors that I mentioned earlier.


 Two of the mantel in the home were decorated.  Here I added greens,  amber ornaments, pine cones, candles, and sticks.  Note the tall candle holder to keep the flame higher than the greenery. 


 In an older post, you might have seen this wreath already, but it was created for this party.  I found vintage kitchen accessories and placed them on a faux wreath with wire.  Then I added berries and bows to complete the look.

 This sled was made for a different client, for the outside, but I thought I would share it here on this post.  


Thursday, December 9, 2010

Making Sugared Pecans

I was going through some of the older recipes and photos on my web site, and this is one of my all time favorites. I am ashamed to say that this might be the first time in many years that I will not find time to make my sugared pecans.The month is flying by and I am focusing on my clients parties (I have my own coming up and my house and my menu is not ready!)  Last year, one of my friends came over and we made a HUGE batch to give out to all of our friends and relatives. This sugared pecan recipe is so easy.  Just make sure they are not too close to the oven element (top and bottom) unless you want black and burnt pecans.  Ick!

Monday, December 6, 2010

Red, Green, and White Candy Buffet


In just a few days, I will be finalizing the decor and styling for a "Farm House Christmas" Corporate/Open House/Christmas party for a client.  I will post the finished rooms after the weekend, but here is some of the candy buffet items I have been working on.  My house looks like a  factory with items for four different parties. Favors, centerpieces, candy buffet items, invitations, custom napkins, and the list goes on.  I am glad I don't have to keep items for my interior design clients in my home.  Well..... that would be kinda nice!

This red, white, and green candy buffet has been fun and even though I have a store and studio to work out of, doing something like this, from home, has its perks.  There were some nights I stayed up late weeding out the pink Mike n Ikes from the red or separating the red jelly candies from the green.  If you want to see a lot of candy buffet ideas that I have found, please check out the page I created for you on my web site.  Candy Buffet Ideas


Sunday, November 21, 2010

Less is More in this home for the holidays

 
The following photos are the talented work of  Mary McDonald as shown in Veranda Magazine


One of the most visited pages on my web site, New England Fine Living,  is the PEACOCK WEDDING and Party page, so I was thrilled when my eyes caught a glimpse of this New England style room with the simple peacocks, fruits, ornaments, and greenery surrounding the entryway to the dining room of this magnificent home.   The bright and stately colors show beautifully against the wood and guilded furniture.  This look could transition easily from pre-Thanksgiving right through to New Years Eve. 

The mansion by my home, Turner Hill Mansion, has a peacock as it's logo.  The previous owner used to raise them on the property (they have a stuffed one inside that I was told was one of the "original" peacock pets), so the first masquerade ball I styled there, for the Ipswich Rotary Fundraiser, had peacock wreaths and candles as the dining table centerpieces.  I even took the peacock statue from my garden and added him to the front entryway of my store. 


The two pictures above look as if the wood has been whitewashed or pickled which is setting off the stunning greens just as much as the dark wood in the first photo. I can't help but wonder if this home is in New England due to a lot of the styling shown in side.


In the dining room, what looks like cedar and fir evergreen takes center stage with just a few touches of white and clear baubles and white flowers, showing us that less really can be more.    You can find more information and photos of other New England style entertaining ideas on my web site, New England Fine Living.com

Friday, November 19, 2010

Making a New England Farm House Country Wreath


I am having so much fun creating items for several holiday parties that I have been hired to style.  One of them will be for a large corporate/friend/ New England house warming party in a private home, and the theme throughout the whole house is " New England Farm House Country".  I will be decorating the mantles with faux greenery (so that they will have their creations year after year) and pine cones, the tree with stars, burlap ribbon (if it works out as planned), an old sled on the dessert station, a red, white, and green candy buffet, and several wreaths.

Here is a wreath I created today for over the kitchen sink.
I first visited many of the local New England flea markets and New England antique stores to find small kitchen items from years gone by and some country theme ribbon.  I will post the finished party pictures next month. 


Creatively placing the items on the wreath with wire, then highlighting the items with small bows and cranberry colored berries were the finishing touch.


Thursday, November 18, 2010

Enchanted Entertaining

Designer Mary McDonald - Photo Veranda Magazine

Below is part of an article I wrote for North Shore Living magazine several years back, and I thought I would share it with you.


The guests have arrived, and as they cross the threshold they are greeted by the soft, sweet sound of holiday music and the beauty of the seasonal decoration.  The family evergreen, recently adorned with treasures from holidays past, fills the room with a calming scent that brings back wonderful memories.  As guests make their way down the hall to see the holiday table, they are awestruck my what they see.

At each seat are small gifts wrapped in silver and gold which contain a gleaming keepsake ornament, napkins have been folded and adorned with ribbons and bells.   The wax dripping from the flickering flame of white candles creates lace patterns as it trickles down the side, and the fresh flowers of the centerpiece add another incredible scent to the room.

Visitors feel like children again as they wonder what is inside the little packages.  Better yet, they feel the warmth of knowing that you took the time to welcome each and every one of them into your home.  Little do they know that you were able to achieve this look with just a few stolen moments, and while you were relaxing.

A fantasy scenario you say... Can I possibly find the time?  The only fantasy here is what your holiday presentation will look like.  If you were able to find the time to relax and read this article, you can find the time to add those extra magical touches that will make your holiday gathering memorable.

Whether you decide to decorate in an early colonial style or an ultra-contemporary look, the following ideas will help inspire the decorating diva in you.  Remember, there are not rules - and no decorating elves looking over your shoulder - so create some time alone, make yourself a cup of tea or coffee, play your favorite holiday music or movie, and start creating your own magic.  To read more on my list of ideas, please visit the Enchanted Entertaining page on my web site. 


Wednesday, November 10, 2010

Enchanted Forest Wedding and Party Ideas


A trend that I found coming this spring, through my internet searching, is the “Enchanted Forest” wedding theme.  This is a theme that is close to my own heart because over 15 years ago, I created an enchanted forest for a children's expo I promoted. I had trees brought in from a local nursery, paths were created, woodland animals were added, but for a wedding, nothing says romance more than beautiful flowing wedding dresses, tall trees full of twinkling lights and birds perched tucked into the branches, rich earthy tones such as greens, browns, and creams.

Katie, a blogger for Wedding Paper Divas, says that the key to achieving this ethereal look is to keep everything soft and rustic, with understated hues and a blend of earthy branches, leaves and blooms punctuated by the heavenly glow of outdoor chandeliers.
For many more photos and information on Enchanted Forest Weddings, please visit my web site.  Enchanted Forest Wedding Ideas
Information found and modified from Wedding Paper Divas.

Tuesday, November 9, 2010

Rotisserie Chicken Caesar Salad Wrap


Rotisserie Chicken Caesar Salad Wrap
If you are looking for a delicious and healthy quick meal, here is a rotisserie chicken wrap that can be made in minutes.  Purchasing prepared rotisserie chickens at the grocery store is a once a month must for me.   I don't always have time to cook or prepare a lunch for myself.  Lately it has been peanut butter sandwiches that I have been quickly slapping together before I fly out the door to leave for a clients or the store.  I think I will make a couple of these wraps and have handy for the next day or two.   I bet they would taste great with a little cucumber in there too!  For more recipes, entertaining ideas, decorating tips, you can visit New England Fine Living.com

Serves 2, < 300 calories
2 ½ oz shredded rotisserie chicken, only breast meat
1 oz romaine lettuce, thinly sliced
2 tablespoons shredded fresh carrots
2 tablespoons low-fat Caesar dressing
½ teaspoons freshly ground black pepper
2 tablespoons low-fat Parmesan cheese
2 La Tortilla Factory Smart & Delicious SoftWraps™
1.    In a small bowl, combine the chicken, lettuce, carrots, dressing, pepper, and mix well.  Divide into two portions.
2.    Place 1 portion of the chicken mixture and half of Parmesan cheese onto a SoftWrap and fold the sides over the filling and roll-up into a wrap.

Monday, October 25, 2010

A creepy sweet sixteen party


This was truly an interesting day.  I drove to my granite vendor, to meet a client's 21 year old daughter, to look at and select granite for her bathroom.  A fun and enjoyable time, but it is a very serious project and I can't wait to see my finished design come to fruition.  After that, I was excited to get back into my car, because I was off to decorate for a Halloween birthday party.  I LOVE HALLOWEEN!  Now mind you, this was for a sweet sixteen OR pretty.  I was asked to bring items for creepy and scary.  Since I was not sure how many items they needed, I loaded up a large plastic bin with just a few things from my private prop arsenal.  

Monday, October 11, 2010

A Very Berry Centerpiece

Here is a scrumptious looking centerpiece that was just sent to me by Tish Boyle, who is editor in chief of Chocolatier and Pastry Art & Design magazines.

Driscoll’s Very Berry Holiday Tree

Makes one table centerpiece

Special equipment:
1 green styrofoam cone (measuring 4-5 inches in diameter at the base and 12 inches high)
1 box of toothpicks

Supplies:
4 one pound containers of fresh Driscoll strawberries
1 bunch fresh mint
1 slice from a carambola fruit (also known as star fruit)*

*Note: If you can’t find a carambola, you can use a 1-inch star-shaped cookie cutter to cut out a star shape from a mango slice instead.

Directions:
1. Wash the strawberries and blot them dry with paper towels. Pull off the green stem from each strawberry. Reserve a perfect strawberry for the top of the ‘tree’.

2. Push a toothpick halfway into the side of the cone, about 1/2 inch from the bottom edge. Secure a strawberry to the toothpick, piercing it through the stem end. Secure another strawberry right next to the first one. Continue securing strawberries to the cone in circular rows up to its top, covering the cone completely. Secure the reserved strawberry to the top of the tree.

3. Remove some mint leaves from the bunch of mint and tuck them between the berries, placing them at about 3-inch intervals.

4. Secure the star-shaped carambola or mango slice to the top of the cone using a toothpick.  For more centerpiece ideas you might like some of the ideas on my web site.  New England Fine Living under the entertaining section.
 

Thursday, September 23, 2010

Halloween Theme Decorating Ideas


I love Halloween!  Maybe it is due to the fact that I was born at the end of October and I always planned Halloween Costume parties, or it is just a fun time to get dressed up and play a different character for the night.  No matter the reason, it I have always enjoyed any reason to host a fun party.  When I was a child, I lived in a 300 year old home that had one of the spookiest basements you can imagine, and guess what... that basement used to make the best haunted house.  I dreaded having to clean up all of the decor I brought down there, but it was well worth it.  
Today, I enjoy Halloween just as much.  Just to prove it, above is a photo from my own Halloween party last year.  Squishing about thirty of my friends into my humble abode was a blast.  


I am involved with the Ipswich Rotary Masquerade Ball for the third year in a row as original creator and head of decor and styling.

Here is a photo of the main ball room last year.  Spooking, black glitter candelabras are placed on each table with black glass stones scattered about and 10 candles at each table.  The lighting, by Boston Uplights changed throughout the night. The first year I had the lights placed in each window of the mansion, so that when guests arrived, the mansion glowed with an eerie purple glow. 
Photo Inspiration Board by Wed Share

Today, I created a new page on my web site that highlights many inspirational boards from fellow business owners that I found on the world wide web.  It is amazing how many Halloween wedding ideas there are or Halloween cocktail party drinks come up when Googled.  It is almost Hair Raising! :-)  If you want to check out the page of photos and inspiration boards, click here to visit that page.